


Setting More Rent Contract Parameters
After a rent contract has been created and released, you can define further useful parameters for this rent contract. This chapter covers, among other things, how to add attributes or how to assign a specific object number to a line. Creating contract and GTC texts is also part of this chapter. This chapter is divided into the following sections:
- Updating a Customized Calendar
- Adding Additional Components
- Adding Additional Agreements
- Adding Attributes
- Adding Text Lines
- Adding Comments
- Creating Contract or GTC Texts
- Assigning Specific Object Numbers to Lines
- Linking a Rent Contract to a Campaign
- Selecting an Alternative Rent Class
- Adding Several Contacts to a Rent Contract
- Setting a Rent End Date in a Rent Contract
Updating a Customized Calendar
You can create customized calendars for a rent contract. This calendar is synchronized on a contract-specific basis with the invoice calendars of rent classes, rent packages and rent objects.
To update a customized calendar, proceed as follows:
- Use the quick search (ALT+Q) to find the Rent Contracts page.
- A list of all rent contracts is displayed.
- Click New to create a new rent contract or open an existing rent contract with the status Open for which you want to create a customized calendar.
- In the General FastTab, select the Create Customized Calendar option from the dropdown list.
- The Edit - Customized Calendar Entries page opens.
- The Date field specifies the date which you want to edit.
- The Day field specifies the day of the week of the selected date.
- Activate the Free field to mark the selected date as a free day.
- Enter a description for the free day in the Description field.
- Close the Edit - Customized Calendar Entries page.
- To synchronize the customized calendar with the invoice calendars in the contract lines and to make sure that the data is consistent, click Actions > Invoice > Full Calendar Synchronisation in the menu bar of the rent contract.
Note
Free days are also automatically added to the invoice calendars of newly added rent classes, rent packages or rent objects.
Once free days are added to an invoice calendar, they must be removed manually from the individual invoice calendars. Removing free days via the Edit - Customized Calendar Entries page only deactivates adding free days automatically to newly added rent classes, rent packages or rent objects.
You have successfully updated a customized calendar.
Adding Additional Components
You can add additional components to already added rent classes of the rent contract. To do so, proceed as follows:
Note
Additional components can only be added if the Contract Status is Open. Only items or resources that have previously been marked as Rent Component can be added. For more information on this, click here.
- Use the quick search (ALT+Q) to find the Rent Contracts page.
- A list of all rent contracts is displayed.
- Click New to create a new rent contract or open an existing rent contract with the status Open to which you want to add additional components.
- Navigate to the Lines FastTab.
- Click the line of the rent class to which you want to add additional components.
- Click Functions > Add Additional components.
You might have to click More Options to view the Functions option. - The Select Rent Class/Package Components window opens.
- Select the component to be added to the rent contract.
- The rent contract is displayed with updated contract lines.
- You can now release the rent contract or make further changes.
Adding Additional Agreements
You can add additional agreements to the rent contract which are not bound to a rent class or rent package. These additional agreements apply to the entire contract and will be displayed on the posted document.
Note
To add additional agreements to a rent contract, you have to define the standard text codes for the additional lines. To do so, proceed as follows:
- Use the quick search (ALT+Q) to find the Standard Text Codes page.
- The Standard Text Codes page is displayed.
- To define a new code, click New in the menu bar.
- Enter a unique Code to label the standard text.
- Enter under Description a specific description of the standard text.
- The changes are saved automatically.
- To add extended texts for a standard text code, click Ext. Texts in the menu bar. They will be included in the rent contract.
- The Extended Text Overview page is displayed.
- Click New in the menu bar.
- The page to set up extended texts opens.
- Navigate to the Lines FastTab.
- Click in a line to add an extended text.
- Add a text under Text.
- Navigate to the Rental FastTab.
- Activate the Rent Contract Additional Agreement toggle switch to display the extended text for additional agreements in the rent contract.
- The changes are saved automatically.
- You can now use the standard text code in rent contracts. The defined extended texts are included in the rent contract.
To add additional agreements to the rent contract, proceed as follows:
- Use the quick search (ALT+Q) to find the Rent Contracts page.
- A list of all rent contracts is displayed.
- Open the rent contract to which you want to add additional agreements or create a new contract.
- Navigate to the Add. Agreements FastTab.
- Under No., select a standard text code for the additional agreements from the dropdown list.
- The previously defined descriptions and extended texts are automatically included when you select a standard text code.
- Optional Edit or expand the extended texts.
- Your changes are saved automatically.
- The next step is to release the rent contract.
Adding Attributes
You can add certain attributes to rent classes of the rent contract. To do so, proceed as follows:
Note
Before you can enter the exact values of the attributes in the rent contract, the attributes must first be deposited in the used rent class. For more information, see Assigning Attributes.
- Use the quick search (ALT+Q) to find the Rent Contracts page.
- A list of all rent contracts is displayed.
- Click New to create a new rent contract or open an existing rent contract with the status Open.
- Add a new rent class for which you have previously assigned attributes.
- Select the rent class in the contract lines.
- Navigate to the Object Attributes FastTab.
- The previously added attributes of this rent class are displayed.
- Fill in the Attribute Value field.
- Optional Select the checkbox in the Print in Delivery/Return column to print the attributes in the delivery/return.
- Your selection is saved automatically.
Note
If you assigned certain attribute values to a rent class, these attribute values will be used as filters when you want to reserve a rent class in the object lines. Only rent classes which match with the assigned attribute values will be displayed on the reservation page. For more information on reservations and assigning rent objects, see Assigning and Returning Rent Objects in a Released Rent Contract.
Adding Text Lines
You can add text lines subsequently to already added rent classes of the rent contract. To do so, proceed as follows:
Note
Text lines can only be added if the Contract Status is Open.
- Use the quick search (ALT+Q) to find the Rent Contracts page.
- A list of all rent contracts is displayed.
- Click New to create a new rent contract or open an existing rent contract with the status Open to which you want to add text lines.
- Navigate to the Lines FastTab.
- Click the line of the rent class to which you want to add text lines.
- Click Manage > Add Text Lines.
- The Contract Text Wizard opens.
- Enter the desired text to be added in the Contract Text column.
- When you have finished, confirm by clicking OK.
- The rent contract is displayed with updated contract lines.
- You can now release the rent contract or make further changes.
Adding Comments
You can add comments to a rent contract or additional contract to share certain information or to take notes. To do so, proceed as follows:
- Use the quick search (ALT+Q) to find the Rent Contracts page.
- A list of all rent contracts is displayed.
- Click New to create a new rent contract or open an existing rent contract with the status Open to which you want to add comments.
- Select Contract > Comments from the menu bar.
- A list containing all comments is displayed.
- The work date is automatically inserted in the Date column.
- Optional Adjust the date.
- Enter your notes or annotations in the Comment column. Formatting or lists are not possible.
- Close the Comments page.
The comments included in a rent contract or an additional contract are also displayed in the Comments FactBox (ALT+F2).
When rent quotes are converted into a rent contract or additional contracts are activated, the deposited comments are automatically transferred into the rent contract.
Creating Contract or GTC Texts
With contract or GTC texts, you can set individual texts or define standard texts for each rent order which are applicable for all rent quotes or rent contracts. These texts can also be created for additional contracts or contract templates. The texts included in a rent contract can be printed in order to provide a printed version for customers or for filing.
Creating Contract Texts
To add contract texts, proceed as follows:
- Use the quick search (ALT+Q) to find the Contract Text List page.
- To create a new contract text, click New.
- A dialog opens.
- In the Doc. Type field, select whether you want to add text lines to a quote, a contract, an additional contract or a contract template.
- Optional In the Language Code field, select the language in which the text lines are written. This is useful if you manage rent orders in different languages.
- Optional In the Order Type field, select the order type that the text lines shall apply to.
- Confirm the dialog with Yes.
- The new text card opens.
- Optional Activate the Print Salutation toggle switch if a salutation shall be printed on the contract reports.
- To add text lines, click the button with the three dots under Start Text Exists, Lessor Text Exists, Lessee Text Exists or End Text Exists.
- The text editor opens.
- To add and format text, proceed as follows:
Working in the Text Editor
Note
The Tooltips for the individual functions are only available in English.
| Icon | Function | Description |
|---|---|---|
 |
Paragraph | Use this function to adjust the paragraph formatting. You can choose from the following options: Paragraph, Heading 1, Heading 2, Heading 3 |
 Font Size |
Use this function to adjust the font size. You can choose from the following options: 9, 11, 13, Default, 17, 19, 21 |
|
 |
Font Family | Use this function to adjust the font of the selected text. You can only choose from the following options: Default, Arial, Courier New, Georgia, Lucida Sans Unicode, Tahoma, Times New Roman, Trebuchet MS, Verdana |
 |
Font Color | Use this function to adjust the font color of the selected text. To remove the font color, select the desired text, click the Font Color function, then click Remove Color. |
 |
Font Background Color | Use this function to adjust the background color that will be used to highlight selected text. To remove the font background color, select the desired text, click the Font Background Color function, then click Remove Color. |
 |
Bold | Use this function to format the selected text in bold. |
 |
Italic | Use this function to format the selected text in italics. |
 |
Underline | Use this function to format the selected text as underlined. |
 |
Remove Format | Use this function if you want to reset the format of the selected text to default values. |
 |
Link | Use this function to add a link to a website. • First, enter the description text for the link. • Select the description text and click on the Link icon. An input field where you can enter the URL address is displayed. • Enter the full URL and confirm your entry by clicking on the green checkmark. 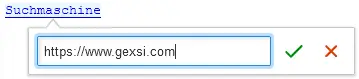 |
 |
Bulleted List | Use this function to create a list with bullet points. You can choose from the following options: Disc, Circle, Square You can then use the Increase Indent and Decrease Indent functions to indent/outdent the listing levels in order to create a hierarchical list.* |
 |
Numbered List | Use this function to create a numbered list. You can choose from the following options: Decimal, Decimal with leading zero, Lower-roman, Upper-roman, Lower-latin, Upper-latin You can then use the Increase Indent and Decrease Indent functions to indent/outdent the listing levels in order to create a hierarchical list.* |
 |
Text Alignment | Use this function to change the alignment of the selected text. You can choose from the following options: Align left, Align right, Align center, Justify |
 |
Increase Indent | This function indents the selected paragraph (one level to the right). With the Bulleted List and Numbered List functions, this can be used to create subordinate elements for hierarchical lists. |
 |
This function moves the selected paragraph one level to the left. With the Bulleted List and Numbered List functions, this can be used to create parent elements for hierarchical lists. |
|
 |
Insert Image | This function adds an image centered on the page. |
 Block Quote |
This function inserts a gray bar on the left side of the paragraph and indents the text. It also changes the font format to italic. | |
 |
Insert Table | This function adds a table centered on the page. More information on this function can be found under Adjust Table. |
 |
Undo | This function undoes the last action performed (text entry, formatting, etc.). You can undo all actions performed since the text editor was last opened. |
 |
Redo | This function can be used to restore actions that have been undone by mistake (text entry, formatting, etc.). You can restore all actions that have been undone since the text editor was last opened, provided that no new actions have been performed in the meantime. |
- Enter the desired content into the panel and change the formatting as needed.
Tip
You can copy existing texts (including images) from other sources such as text processing programs or websites and paste them into the input panel. Formatting is automatically applied based on the available options in the text editor and can be adjusted later.
Add Table
Simple tables can be created quickly, but complex variants are also possible. To create a table, proceed as follows:
- Click on the Insert Table icon in an empty line.
- A dropdown window with multiple lines and columns opens. These represent the number of lines and columns of the table to be created.
- Move your mouse pointer to the cell that should define the last row and last column of the new table. The area to the left and above the cell is highlighted in blue and contains the new table.
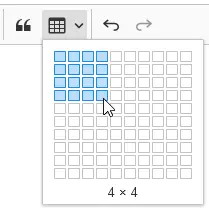
- Click on the cell to create a table with the selected number of lines and columns.
- Enter the desired text in the cells and format it as needed using the functions in the menu bar.
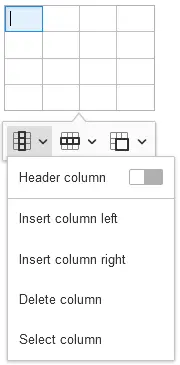
There are also table-specific functions that can be used to edit columns, lines, and cells separately:
Column Options
| Function | Description |
|---|---|
| Header column | Activate this toggle switch to define or highlight the selected column including all columns to the left of the selected cell as heading(s). |
| Insert column left | Inserts a column to the left of the selected cell. |
| Insert column right | Inserts a column to the right of the selected cell. |
| Delete column | Deletes the column with the selected cell. |
| Select column | Selects the entire column of the selected cell. |
Line Options
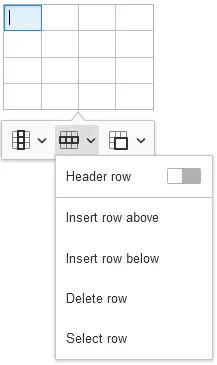
| Function | Description |
|---|---|
| Header row | ctivate this toggle switch to define or highlight the selected line including all lines above the selected cell as heading(s). |
| Insert row above | Inserts a line to the left of the selected cell. |
| Insert row below | Inserts a line to the right of the selected cell. |
| Delete column | Deletes the line with the selected cell. |
| Select column | Selects the entire line of the selected cell. |
Cell Options
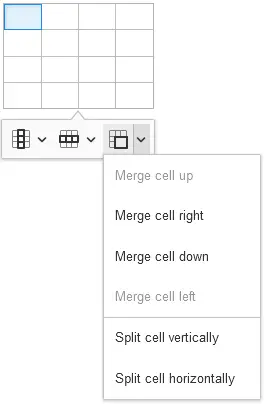
| Function | Description |
|---|---|
| Merge cell up | Merges the selected cell with the cell above. |
| Merge cell right | Merges the selected cell with the cell to the right. |
| Merge cell down | Merges the selected cell with the cell below. |
| Merge cell left | Merges the selected cell with the cell to the left. |
| Split cell vertically | Splits the selected cell into two and creates a new cell to the right of the selected cell. |
| Split cell horizontally | Splits the selected cell horizontally and creates a new cell below the selected cell. |
Tip
Go to the next cell by using the TAB key. Using the TAB key at the end of the table creates new lines.
Note
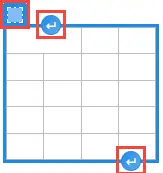
To insert a new paragraph before or after a table, click on the square above the top cell of the table to select the entire table, then click on the white paragraph symbol in the blue circle to add a paragraph before or after the table.
- Close the text editor.
- Optional Add more texts in the Contract Lines Text FastTab. The texts are added to the related sections of the contract.
- In the Line Type column, select whether you want to add an Additional Text, a text for Rent Objects, a text for Payment Method & Terms, a GTC text, a text for Additional Agreements or a text for Shipping Information.
- In the Line Header Exists column, select whether the related contract lines text should include a headline.
- To add a headline, click No.
- Edit the text in the text editor.
- If a text is now included, the line displays Yes.
- In the Line Start Text Exists column, select whether the related contract lines text should include an additional text before the relevant contract lines.
- To add a start text, click No.
- Edit the text in the text editor.
- If a text is now included, the line displays Yes.
- In the Line End Text Exists column, select whether the related contract lines text should include an additional text after the relevant contract lines.
- To add an end text, click No.
- Edit the text in the text editor.
- If a text is now included, the line displays Yes.
- Close the text card.
Creating GTC Texts
To add GTC texts, proceed as follows:
- Use the quick search (ALT+Q) to find the General Terms & Conditions page.
- A list with all GTC texts is displayed.
- Select New in the menu bar to create a new GTC text.
- A new card for the general terms & conditions opens.
- In the General FastTab, enter a unique label for the GTC text in the GTC Code field.
- In the Valid From field, enter the date from which the GTC text is supposed to be valid.
- Optional In the Valid Until field, enter the date until which the GTC text should remain valid.
- To add a new page to the GTC text, click No in the General Terms & Conditions Text FastTab in the Content Exists column.
- The text editor opens.
- To add and format text, proceed as follows:
Note
The Tooltips for the individual functions are only available in English.
| Icon | Function | Description |
|---|---|---|
|
Paragraph | Use this function to adjust the paragraph formatting. You can choose from the following options: Paragraph, Heading 1, Heading 2, Heading 3 |
Font Size |
Use this function to adjust the font size. You can choose from the following options: 9, 11, 13, Default, 17, 19, 21 |
|
|
Font Family | Use this function to adjust the font of the selected text. You can only choose from the following options: Default, Arial, Courier New, Georgia, Lucida Sans Unicode, Tahoma, Times New Roman, Trebuchet MS, Verdana |
|
Font Color | Use this function to adjust the font color of the selected text. To remove the font color, select the desired text, click the Font Color function, then click Remove Color. |
|
Font Background Color | Use this function to adjust the background color that will be used to highlight selected text. To remove the font background color, select the desired text, click the Font Background Color function, then click Remove Color. |
|
Bold | Use this function to format the selected text in bold. |
|
Italic | Use this function to format the selected text in italics. |
|
Underline | Use this function to format the selected text as underlined. |
|
Remove Format | Use this function if you want to reset the format of the selected text to default values. |
|
Link | Use this function to add a link to a website. • First, enter the description text for the link. • Select the description text and click on the Link icon. An input field where you can enter the URL address is displayed. • Enter the full URL and confirm your entry by clicking on the green checkmark. |
|
Bulleted List | Use this function to create a list with bullet points. You can choose from the following options: Disc, Circle, Square You can then use the Increase Indent and Decrease Indent functions to indent/outdent the listing levels in order to create a hierarchical list.* |
|
Numbered List | Use this function to create a numbered list. You can choose from the following options: Decimal, Decimal with leading zero, Lower-roman, Upper-roman, Lower-latin, Upper-latin You can then use the Increase Indent and Decrease Indent functions to indent/outdent the listing levels in order to create a hierarchical list.* |
|
Text Alignment | Use this function to change the alignment of the selected text. You can choose from the following options: Align left, Align right, Align center, Justify |
|
Increase Indent | This function indents the selected paragraph (one level to the right). With the Bulleted List and Numbered List functions, this can be used to create subordinate elements for hierarchical lists. |
|
This function moves the selected paragraph one level to the left. With the Bulleted List and Numbered List functions, this can be used to create parent elements for hierarchical lists. |
|
|
Insert Image | This function adds an image centered on the page. |
Block Quote |
This function inserts a gray bar on the left side of the paragraph and indents the text. It also changes the font format to italic. | |
|
Insert Table | This function adds a table centered on the page. More information on this function can be found under Adjust Table. |
|
Undo | This function undoes the last action performed (text entry, formatting, etc.). You can undo all actions performed since the text editor was last opened. |
|
Redo | This function can be used to restore actions that have been undone by mistake (text entry, formatting, etc.). You can restore all actions that have been undone since the text editor was last opened, provided that no new actions have been performed in the meantime. |
- Enter the desired content into the panel and change the formatting as needed.
Tip
You can copy existing texts (including images) from other sources such as text processing programs or websites and paste them into the input panel. Formatting is automatically applied based on the available options in the text editor and can be adjusted later.
Add Table
Simple tables can be created quickly, but complex variants are also possible. To create a table, proceed as follows:
- Click on the Insert Table icon in an empty line.
- A dropdown window with multiple lines and columns opens. These represent the number of lines and columns of the table to be created.
- Move your mouse pointer to the cell that should define the last row and last column of the new table. The area to the left and above the cell is highlighted in blue and contains the new table.
- Click on the cell to create a table with the selected number of lines and columns.
- Enter the desired text in the cells and format it as needed using the functions in the menu bar.
There are also table-specific functions that can be used to edit columns, lines, and cells separately:
Column Options
| Function | Description |
|---|---|
| Header column | Activate this toggle switch to define or highlight the selected column including all columns to the left of the selected cell as heading(s). |
| Insert column left | Inserts a column to the left of the selected cell. |
| Insert column right | Inserts a column to the right of the selected cell. |
| Delete column | Deletes the column with the selected cell. |
| Select column | Selects the entire column of the selected cell. |
Line Options
| Function | Description |
|---|---|
| Header row | ctivate this toggle switch to define or highlight the selected line including all lines above the selected cell as heading(s). |
| Insert row above | Inserts a line to the left of the selected cell. |
| Insert row below | Inserts a line to the right of the selected cell. |
| Delete column | Deletes the line with the selected cell. |
| Select column | Selects the entire line of the selected cell. |
Cell Options
| Function | Description |
|---|---|
| Merge cell up | Merges the selected cell with the cell above. |
| Merge cell right | Merges the selected cell with the cell to the right. |
| Merge cell down | Merges the selected cell with the cell below. |
| Merge cell left | Merges the selected cell with the cell to the left. |
| Split cell vertically | Splits the selected cell into two and creates a new cell to the right of the selected cell. |
| Split cell horizontally | Splits the selected cell horizontally and creates a new cell below the selected cell. |
Tip
Go to the next cell by using the TAB key. Using the TAB key at the end of the table creates new lines.
Note
To insert a new paragraph before or after a table, click on the square above the top cell of the table to select the entire table, then click on the white paragraph symbol in the blue circle to add a paragraph before or after the table.
-
Close the text editor.
-
Optional To add another page to the GTC text, click in the next empty line in the table in the General Terms & Conditions Text FastTab. Proceed as described above.
-
Optional To edit a GTC text, click Yes in the relevant line in the Content Exists column. The text editor is opened and you can edit the text of the page.
-
Optional To create a new version of the GTC text, click New in the menu bar. The number in the Version No. field is counted up and you have to fill in the Valid From field again. The new version is also displayed on the General Terms & Conditions page.
Printing GTC Texts
To print GTC texts, proceed as follows:
- Use the quick search (ALT+Q) to find the General Terms & Conditions page.
- A list with all GTC texts is displayed.
- Open the desired GTC text or create a new one.
- Select Operation > Print from the menu bar.
- The Rent GTC page is displayed.
- Select the desired printer in the Printer field.
- Optional Activate the Hide Header/Footer button in the Options FastTab to hide the header/footer in the print.
- Enter the number of printouts in the No. of Copies field.
- Optional In the Advanced FastTab, specify the maximum generating time (Maximum Time Generating Time) or the maximum number of lines to be included in the print (Maximum Number of Lines). If the entered values are exceeded, the print will be canceled.
- To start printing, click Print.
Tip
You can view a preview of the printout by clicking Preview. Under Send to, you can download the printout as a PDF or a Microsoft Word document to send it via email.
Note
GTC texts can be printed simultaneously with a quote, a contract, or an additional contract by default. To do so, the relevant options must be activated on the Rent Setup page in the Report Setup FastTab.
Assigning Specific Object Numbers to Lines
You can assign a specific rent object to a rent contract line. This is useful, for example, if the customer needs a specific machine for staffing or compatibility reasons.
To assign a specific object number to a rent contract line, proceed as follows:
Important
To use this option, the Selecting of Object No. in contract allowed toggle switch must be activated in the Rent Setup.
Note
Specific object numbers can only be assigned to lines in rent contracts with the Contract Status Open. This is not possible in inactive or active rent contracts with existing postings.
- Use the quick search (ALT+Q) to find the Rent Contracts page.
- A list of all rent contracts is displayed.
- Open the rent contract in which you want to assign a specific object number to a line.
- Click in the line of the rent object to which you want to assign a specific object number.
- Click Line > Functions > Add Object No..
You might have to click More Options to view the Line option. - A new window opens.
- Select an available object in the lower section under Rent Reservation Matrix.
- Select Select > Select in the menu bar.
- The number of the selected rent object is added in the Object No. column to the rent contract line.
- The rent object is now planned for this line, i.e. it cannot be reserved or planned for other rent contracts.
- Close the Rent Contracts page.
Editing or Deleting a Specific Object Number
To edit or delete a specific object number, proceed as follows:
- Use the quick search (ALT+Q) to find the Rent Contracts page.
- A list of all rent contracts is displayed.
- Open the rent contract in which you want to edit or delete a specific object number.
- Click in the line of the rent object whose specific object number you want to edit or delete.
- Click Functions > Remove Object No. to delete a specific object number.
You might have to click More Options to view the Functions option. - The specific object number is now deleted.
- Optional Assign a new object number. You can find more information on this under Assigning Specific Object Numbers to Lines.
- Close the Rent Contracts page.
Linking a Rent Contract to a Campaign
To link a rent contract to a campaign, proceed as follows:
- Use the quick search (ALT+Q) to find the Rent Contracts page.
- A list of all rent contracts is displayed.
- Open the rent contract you want to link to a campaign or create a new contract.
- Select the Campaign No. field in the General FastTab. You might have to click Show more to view this field.
- A list containing all existing campaigns is displayed.
- Select the desired campaign from the list or create a new one.
Selecting an Alternative Rent Class
This section describes how to select a rent object from an alternative rent class in a rent contract. This is useful if a rent object is unavailable in a rent class, but is available in a different rent class. This way, the (service) item can still be delivered. To select an alternative rent class, proceed as follows:
Note
The Alternative rent classes allowed option must be activated on the Rent Setup page to enable selecting an alternative rent class. You can find more information about this in the Rent Setup section.
- Use the quick search (ALT+Q) to find the Rent Contracts page.
- A list of all rent contracts is displayed.
- Open the rent contract to which you want to add an alternative rent class or create a new contract.
- In the Object Lines FastTab, select the Alternative Rent Class > Select Alternative Rent Class option from the menu bar.
You might have to click More Options to view the Alternative Rent Class option. - A window containing all available rent classes is displayed.
- Select the desired rent class.
- The checkbox in the Alternative Rent Class Selected column is selected.
- In the FactBox pane (ALT+F2), in the Object Line Details FactBox tab, you can see which rent class has been selected instead under Alternative Rent Class.
- Optional To reset the alternative rent class and reuse the previous rent class, select the Alternative Rent Class > Reset Rent Class option from the menu bar of the Object Lines FastTab.
You might have to click More Options to view the Alternative Rent Class option.
Adding Several Contacts to a Rent Contract
You can include multiple contacts in an open rent contract. This way, the person in charge has the option to call another contact person in case the main contact is not available. When the rent object is further processed, these contacts will also be included in the delivery/return. To add contacts to a rent contract, proceed as follows:
- Use the quick search (ALT+Q) to find the Rent Contracts page.
- A list of all rent contracts is displayed.
- Open the rent contract to which you want to add contacts or create a new contract.
You can either select a contact from the contacts linked with the customer or enter a contact manually.
- To add a contact linked to a customer, click the three dots in the Contact Name column in the Contract Contacts FastTab.
- The Contacts window opens and displays the contacts that are linked to the customer from the rent contract.
- Select the desired contact.
- To manually add a contact to the contract, complete the information of the table in the Contract Contacts FastTab.
- Optional Use the Contact Type field to add more details to the contact.
When the rent object is further processed, these contacts will also be included in the delivery/return.
Setting a Rent End Date in a Rent Contract
You can set the end of the rent period in a rent contract to end the invoice plan before the rent return is posted. Setting the rent end date has the advantage that after this date no invoices will be accidentally sent to the customer. The rent end date can also be set via the later created rent return. To set the rent end date in a rent contract, proceed as follows:
Note
To be able to enter an ending date for the rent period, the following requirements must be met:
- The Status of the rent object in the Object Lines FastTab must either be Delivered or Returned.
- You can only enter a rent end date if the full quantity has been returned. You cannot enter a rent end date with only a partial return.
- Open a rent contract.
- In the Object Lines FastTab, select Manage > Register Rent End Date from the menu bar.
- The Set Rent End Date window opens.
- Enter the desired end date into the Rent End Date field. Either select a date from the calendar or enter T to automatically enter the current date.
- In the Return Date field, enter the return date on which the contract objects have been returned.
- Optional Enter the end date for the vendor into the Rent End Date (Vendor) field. This date is transferred to the sub-rent contract.
- In the Rent End Date Reported On Date field, enter the date on which the rent end was set.
- In the Rent End Date Reported On Time field, enter the time at which the rent end was set.
- The checkbox in the Rent End Date registered column is selected automatically. The field in the Quantity to Process column can now no longer be edited.
- The date which was entered in the Rent End Date field will be automatically transferred to the Invoice To column in the Lines FastTab.
- Optional To edit the rent end date later, undo the rent end date registration by clicking Rent End Date > Undo Rent End Date Registration in the menu bar of the Object Lines FastTab.