


Setting Invoicing Parameters in Rent Contracts
You can specify certain parameters for the subsequent invoicing of rent contracts. This chapter is divided into the following sections:
- Setting an Invoice Frequency
- Setting the First Invoice Period
- Setting a Minimum Rent Period
- Setting Up Invoice Limits
- Creating a Rent Contract with Consumption-Based Invoicing
- Setting Up Payment Conditions
- Calculation List in Rent Contracts
Setting an Invoice Frequency
By default, the standard invoice frequency selected in the Rent Setup is set in new rent contracts. However, you can change the invoice frequency in rent contracts. To do so, proceed as follows:
Note
The invoice frequency can only be edited if the Contract Status = Open.
Note
To invoice a rent contract in advance, you have to select an invoice frequency with Moment of Invoice = Before (Period).
- Use the quick search (ALT+Q) to find the Rent Contracts page.
- A list of all rent contracts is displayed.
- Click New to create a new rent contract or open an existing open rent contract for which you want to change the invoice frequency.
- Navigate to the Invoice Details FastTab.
- Click the Invoice Frequency dropdown list.
- A window opens in which you can select a (deviating) invoice frequency.
- Click the desired invoice frequency.
- Optional Close the window by clicking OK.
- The rent contract is displayed again.
- Optional You can now release the rent contract or make further changes.
Tip
If your company operates internationally, you can store translations for invoice frequencies in different languages in Aptean Rental. You can find all important information on this in the Setting Up Invoice Frequency Translations section.
Setting the First Invoice Period
By setting a first invoice period, you can specify when the first invoice shall be sent to the customer independently of the set invoice frequency. After the first invoice has been sent to the customer, the following invoices are created according to the invoice frequency set in the rent contract. To set a first invoice period, proceed as follows:
- Use the quick search (ALT+Q) to find the Rent Contracts page.
- A list of all rent contracts is displayed.
- Click New to create a new rent contract or open an existing open rent contract for which you want to set a first invoice period.
- Navigate to the General FastTab.
- In the First Invoice Period Option field, select the First Invoice Period option.
You now have two ways to set up the interval.
- Either, in the First Invoice Period (Days) field, enter the number of days after the contract start date after which the invoice is to be created. The date is automatically calculated and entered into the First Invoice Date field.
- Or enter the desired first invoice date directly into the First Invoice Date field.
If you want to switch from a first invoice period to a minimum rent period after releasing the rent contract, an additional contract is needed.
Setting a Minimum Rent Period
A minimum rent period specifies the period that the customer always has to pay for, even if all rent objects are returned before the end of this period. To define a minimum rent period, proceed as follows:
- Use the quick search (ALT+Q) to find the Rent Contracts page.
- A list of all rent contracts is displayed.
- Click New to create a new rent contract or open an existing open rent contract for which you want to define a minimum rent period.
- Navigate to the General FastTab.
- In the First Invoice Period Option field, select the Minimum Rent Period option.
You now have two ways to set up the minimum rent period.
- Either, in the Minimum Rent Until (Days) field, enter the number of days following the contract start date for which rent has to be paid. The date is automatically calculated and entered into the Minimum Rent Until Date field.
- Or enter the desired end date of the minimum rent directly into the Minimum Rent Until Date field.
If you want to switch from a minimum rent period to a first invoice period after releasing the rent contract, an additional contract is needed.
Setting Up Invoice Limits
For each rent contract, you can specify the date up to which invoice lines can be invoiced. Only invoice lines dated before the limit date can be invoiced. This applies to both single and batch invoicing. Proceed as follows to set up invoice limits:
Note
To be able to use invoice limits, the following settings must be configured in advance:
- On the Rent Setup page, activate the Use Invoice Limits toggle switch in the Invoice Plan Settings FastTab.
- On the Order Types page, select the checkbox in the Invoice Limit Enabled column for the order type that should be allowed to use invoice limits. For rent contracts with this order type, invoice limits can then be defined.
- Open a rent contract that has been released.
- Make sure the rent contract uses an order type with the Invoice Limit Enabled checkbox selected.
- Select Invoice > Invoice Limits from the menu bar.
- The Invoice Limits page is displayed.
- Mark the desired line.
- Click Set Next Invoice Date in the menu bar.
- The Date-Time Dialog window opens.
- In the Date field, set the desired date.
- Click OK to confirm.
- The date is entered in the Next Invoice Date column. The checkbox in the Manually Set column is selected automatically.
The Invoiced to Date column displays the last invoice date. If this column is empty, no invoice has been posted for this line yet.
The Invoice From Date column displays the next scheduled invoice date according to the invoice plan. If this column is empty, the contract is either not yet ready for invoicing or has already been fully invoiced.
Tip
To delete the invoice limits for all lines, select Actions > Delete Limits from the menu bar.
Creating a Rent Contract with Consumption-Based Invoicing
It is possible to set the rent price for a rent contract based on consumption data. To do so, proceed as follows:
Note
To be able to use consumption prices in a rent contract, the desired rent class must have at least one line with the Consumption price type.
For more information on adding consumption data to a rent class, see
Creating a Rent Class.
- Use the quick search (ALT+Q) to find the Rent Contracts page.
- A list of all rent contracts is displayed.
- Open the rent contract to which you want to add a consumption-based price line.
or
Create a new consumption-based rent contract. For more information about creating a new rent contract, see Creating a Rent Contract. - Add a rent class with the Consumption price type to the contract. For more information on adding consumption data to a rent class, see Creating a Rent Class.
- Select the desired consumption type.
- Register the consumption data in the individual processing stages to include them in the invoice plan. To do so, use the corresponding deliveries/returns for returns or rent breaks.
- The registered values are included in the invoice plan and are invoiced according to the invoice cycle. For more information about creating invoices, see Creating an Invoice from a Rent Contract.
Tip
The consumption data from the rent contract can be synchronized with the consumption data of an item or service item. This way, the consumption of the rent order is included and calculated into the consumption log of the item or service item.
Proceed as follows to synchronize the consumption data:
- Open the Consumption Types page.
- A list with all consumption types is displayed.
- The Consumption Code column shows the label of the consumption type which is used for the rent contracts.
- The Consumption Interface Type column shows the label of the consumption type which is used for the item or service item.
- Assign the Consumption Interface Type and the related Unit of Measure Code to the Consumption Code to add the registered consumption data from rent contracts to certain items or service items.
- Close the Consumption Types page.
Setting Up Payment Conditions
You can set up certain payment conditions for a customer. If you create a rent contract for this customer, the payment conditions are automatically included in the contract. For more information on creating payment conditions for customers, see Setting Up Payment Conditions for Customers.
Calculation List in Rent Contracts
This section describes how you can view the calculation list in rent contracts. This provides an overview of the rent amount, amounts from linked sub-rent documents and the contribution margin to be achieved. Additionally, it shows whether the contribution margin is achieved with these documents. This overview is useful to see at a glance whether the calculation is good or whether something has to be modified.
Note
The calculation list is only displayed in rent contracts if:
- the sub-rent functionality on the Rent Setup page is activated.
- the rent contract is linked to at least one sub-rent request.
- the rent contract contains contract lines where the Line Amount Excl. VAT column in the Lines FastTab is filled in.
- the Invoice Frequency field is filled in the Invoice Details FastTab of the rent contract.
The calculation list can be displayed in the FactBox area (ALT+F2). You can find this overview in the Contribution Margin Calculation Worksheet FactBox.
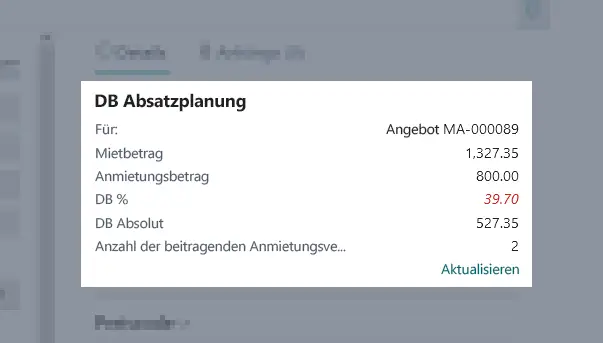
- If the contribution margin set up on the Rent Setup page has been met, the value in the CM % line is highlighted in green.
- If the contribution margin that has been set up has not been met, the value in the CM % line is highlighted in red.
'Toggle Switch' Table
The following table describes the toggle switch status for this chapter.
| Icon | Status | Description |
|---|---|---|
  |
Deactivated | The option is not activated and the related function is not available. |
  |
Activated | The option is activated and the related function is available. |